Extending a VM Virtual Disk

Last week, I extended the virtual disk of the VM hosting my jenkins server. Shortly after, I increased the maximum disk size of one of the job’s docker containers, maxing out the disk. This meant that I needed to extend the drive*… again*. If you ever do something twice, it is best to have it documented for the potential third time. So, here we are.
Assumptions
Before getting started, I want to point out that this method is specific to the environment I currently have for my VMs. Specifically, I am using kvm/qemu and virt-manager, with qcow2 images for the virtual disks. Additionally, the specific VM I was extending was installed with LVM and it’s main partition was formatted with a xfs file system. Just note that some steps may differ elsewhere. This is what worked for me.
Clone VM

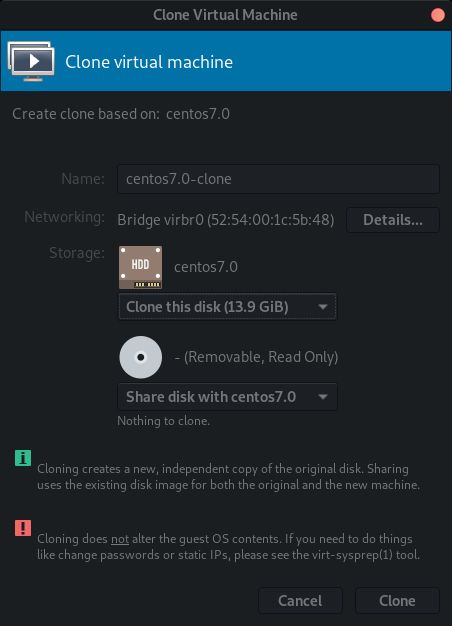
While not required, it isn’t a bad idea to first clone the VM (just
in case anything becomes damaged). If using virt-manager, cloning a
VM is as simple as right clicking a powered down VM, and selecting
“Clone…”. A window will pop up with options for cloning the
VM. Make the desired name changes and hit Clone.
Extend qcow2 file
The first step in resizing the virtual drive is to first expand
the qcow2 image. By default, the images tend to be stored at
/var/lib/libvirt/images/ and will require root privileges to
access. Virt-Manager can be used to double check which image the VM is
using for its disk. To resize the qcow2 image, use the qemu-img resize command, providing it the image file path/name and then the size
to expand it. For example, I used +40G in my command (qemu-img resize Jenkins.qcow2 +40G) to extend the image by 40GB.
root@ninetales:/var/lib/libvirt/images# qemu-img info Jenkins.qcow2
image: Jenkins.qcow2
file format: qcow2
virtual size: 20G (21474836480 bytes)
disk size: 20G
cluster_size: 65536
Format specific information:
    compat: 1.1
    lazy refcounts: true
    refcount bits: 16
    corrupt: false

root@ninetales:/var/lib/libvirt/images# qemu-img resize Jenkins.qcow2 +40G
Image resized.

root@ninetales:/var/lib/libvirt/images# qemu-img info Jenkins.qcow2
image: Jenkins.qcow2
file format: qcow2
virtual size: 60G (64424509440 bytes)
disk size: 20G
cluster_size: 65536
Format specific information:
    compat: 1.1
    lazy refcounts: true
    refcount bits: 16
    corrupt: false

root@ninetales:/var/lib/libvirt/images#
The command qemu-image info can be helpful in verifying that the resize
worked, by checking the size of the image.
Gparted Live ISO
For the next few steps, it is a good idea to boot the system from a live CD.
This will run the OS in RAM, allowing the disk to be fully unmounted. With
access to the VM’s display, an ISO such as the gparted live
CD can be used to resize the partitions,
as it contains the amazing graphical tool, gparted (duh).
Note: If you boot up the VM and don’t see the new unallocated space available in the volume… make sure you didn’t accidentally boot the backup VM… Not that I made such a mistake… :P
LVM Resize
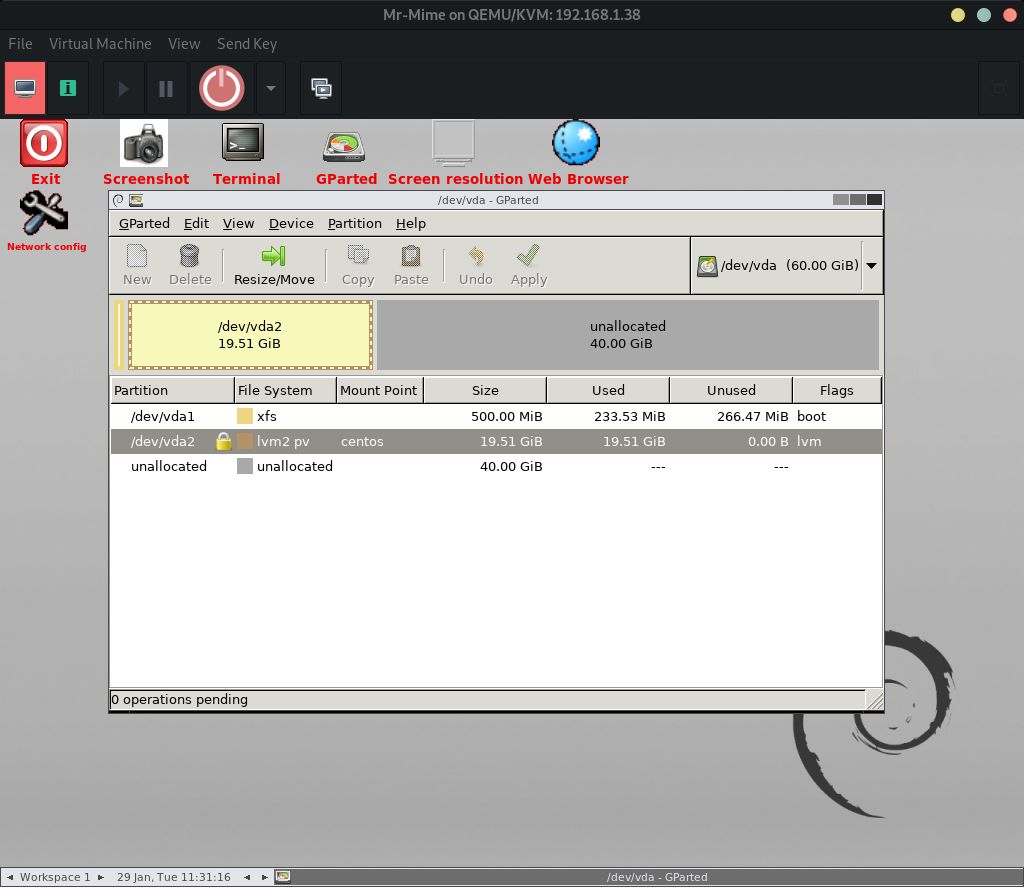
My VM is installed using LVM volumes, so I had to resize them before I could resize the file system. Gparted will do this automatically when resizing a partition.

To resize the partition, first verify that the correct virtual disk is selected in the top right drop-down the window. Next, select the partition to expand, and click the “Resize/Move” icon at the top.

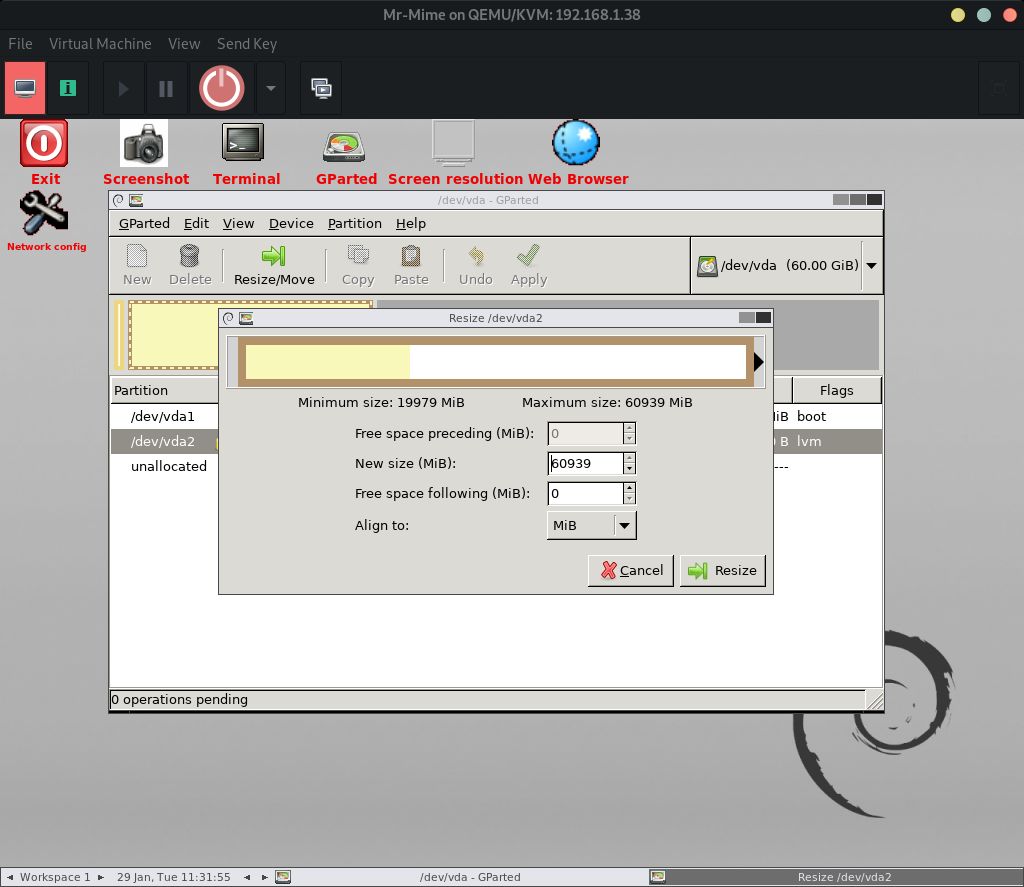
In the resize window, I changed the Free space following (MiB)
value to 0, to expand the partition to use all of the unallocated space.
Lastly, I hit the Resize button and let Gparted do it’s magic.
Grow XFS
Finally, with the lvm volume expanded, I just had to grow my file system to use
the new space. I booted up the VM and logged in. This VM uses an xfs file
system, so I was able to use the xfs_growfs command to expand the partition:
[ryan@mr-mime ~]$ sudo xfs_growfs /dev/centos/root
(... Ryan removed output for the post...)
data blocks changed from 4851712 to 15322112

[ryan@mr-mime ~]$ df -h
Filesystem               Size  Used Avail Use% Mounted on
/dev/mapper/centos-root   59G   19G   40G  32% /
devtmpfs                 1.9G     0  1.9G   0% /dev
tmpfs                    1.9G  8.0K  1.9G   1% /dev/shm
tmpfs                    1.9G  8.7M  1.9G   1% /run
tmpfs                    1.9G     0  1.9G   0% /sys/fs/cgroup
/dev/vda1                497M  231M  267M  47% /boot
tmpfs                    379M     0  379M   0% /run/user/1000
Note: My VM’s disk space was COMPLETELY full. This meant that I couldn’t use auto tab complete in my shell because it spit out there’s no disk space. Typing the command out fully by hand, still worked.
With the xfs partition resized, I rebooted the VM for good measure, and everything was up and running again.
That’s about it. Remember, the steps I took might need to be altered for other environments, but this post should still be a good starting point. I know it will help me when I acidently overfill this VM again… Enjoy!